

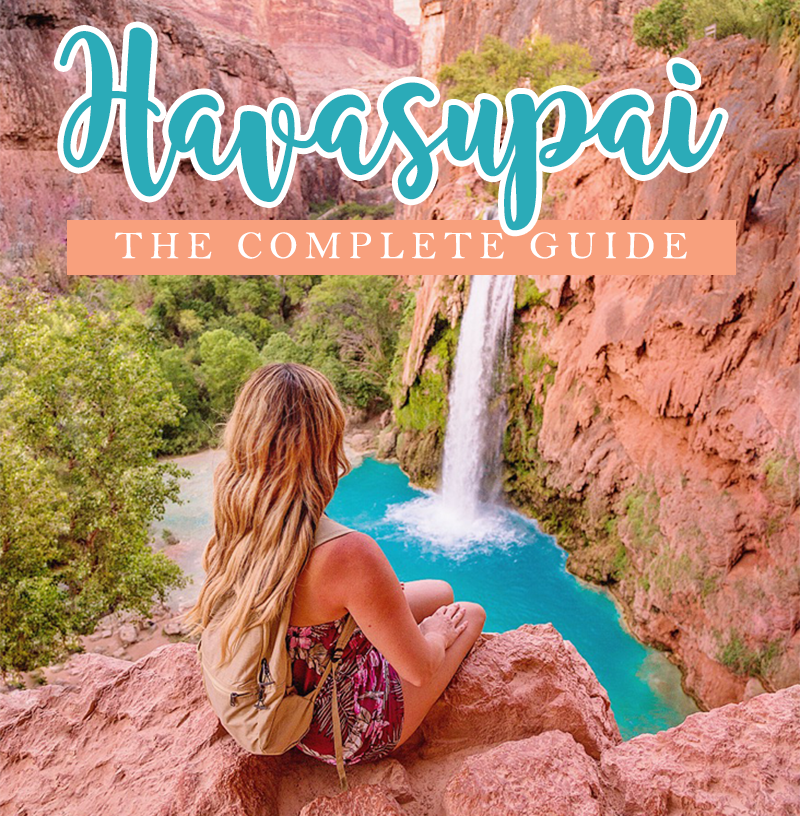
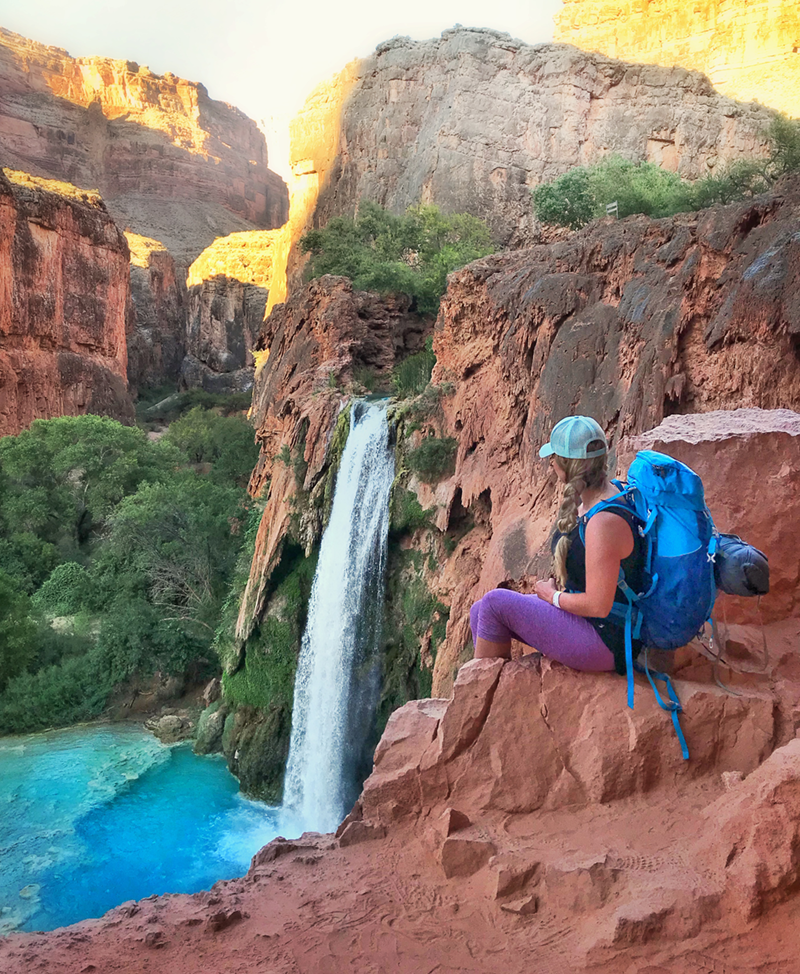
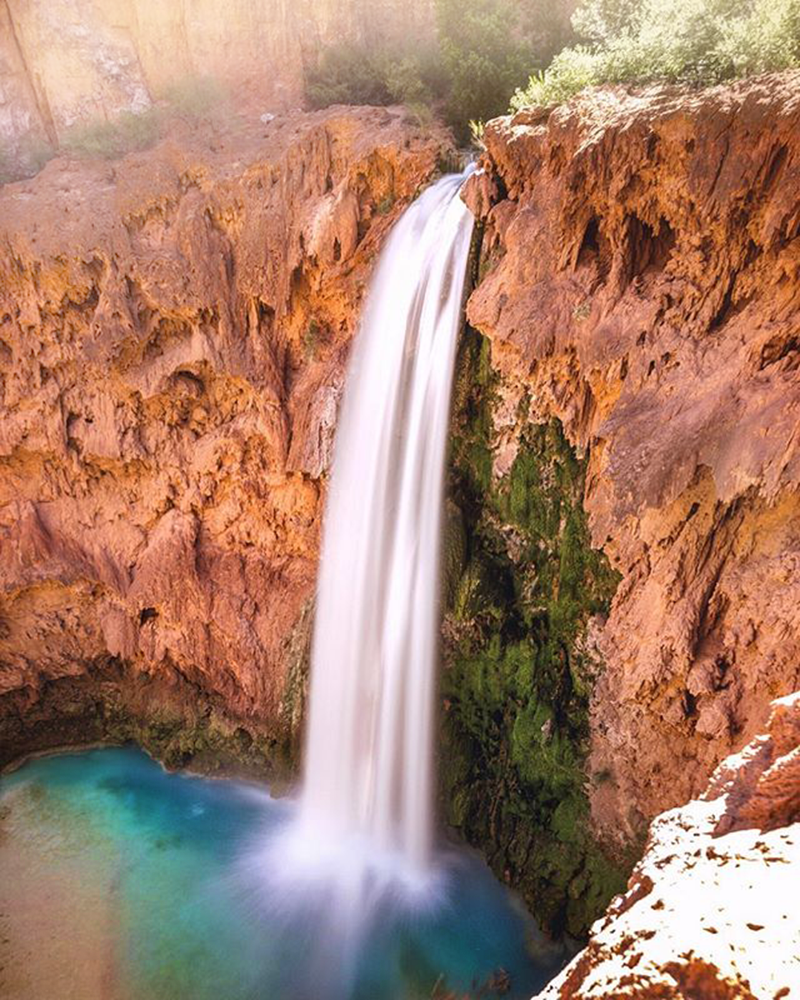
Havasupai is a lush, dream-like paradise located in a desert landscape. Here, at least 5 massive, stunning turquoise waterfalls spill between 40 and 200 feet over red rocky cliffs and plunge into vibrant pools below.
QUICK NAVIGATION LINKS:
- What and where is Havasupai?
- How to Secure Havasupai Permits
- Havasupai Campground Costs
- Getting to Havasupai
- Best Time of the Year to Go To Havasupai
- Havasupai Trail & Village Map
- Havasupai Hiking Information
- Available Drinking Water
- Checking in at village of Supai
- Don’t want to hike?
- Havasupai Campground Information
- Hike to Mooney Falls
- Hike to Beaver Falls
- Havasupai Rules & Laws
- Hiking Out from Havasupai
- What to Pack for Havasupai
What and where is Havasupai?
Havasupai is located in the southwestern section of the spectacular Grand Canyon in Northern Arizona, at the end of Route 18 off historic Route 66. Thousands of visitors make a pilgrimage to this area each year to camp in the stunning valley and play in its waterfalls.
The word “Havasupai” means “people of the blue-green waters”.
Havasupai lies outside the boundary and jurisdiction of Grand Canyon National Park. It is located on Tribal land that is governed by the Supai people, who are intimately connected to the land. For years, the Tribe has generously allowed tourists to explore this beautiful paradise.
To reach the waterfalls, visitors must first hike 10 miles to the Havasupai Campground. From here, the multiple waterfalls can be reached. However, day-trips into Havasupai are not permitted, and each visitor must have permits and reservations to the campground.
Read on to learn how to secure permits to visit this bucket-list place!
Scoring Your Permit into Havasupai:
To visit Havasupai, you first must have permits and reservations to camp over night, or to stay at the lodge. As you can guess, securing these permits is not an easy task!
Reservations for the campground (February through November) go on sale at 8:00 am MST on February 1st for the entire year.
Havasupai campground reservations can be booked online here.
Each year, campground reservations sell out for the entire year, within the first few hours on February 1st.
Reservations for the lodge go on sale June 1 for the following year (April through December).
Reservations for lodge stays are only available by phone (928-448-2111 or 928-448-2201). The lodge is located in the small town of Supai, which is 2 miles from Havasu Falls and the campground.
Expect repeat busy signals. Have back-up dates ready if your first choice isn’t available. (There is always a small chance of cancellations)
However, if you missed booking your reservation on February 1, there’s still hope! The Tribe has (as of 2019) created an official transfer system where people who cannot use their reservation can transfer it to others, or put it back up for sale on the reservation website. Visit the Havasupai Reservations website for more information.

Havasupai Campground Costs:
2019 Havasupai Campground Reservations costs:
$100 per person, per weekday night (Monday to Thursday nights)
$125 per person, per weekend night (Friday/Saturday/Sunday nights)
These prices include all necessary permits, fees, and taxes.
As of 2019, there is a required minimum stay of 3 nights beginning in 2019. That means each person can expect to pay between $300 to $375 each, even if you are only staying one or two nights.
The Havasupai Tribe requires full payment at the time your reservation is made.
 Getting to Havasupai:
Most people choose to fly into either Las Vegas or Phoenix, then rent a car and drive to Hualapai Hilltop, which is the start of the trail where you can park your car and begin the long hike into Havasupai.
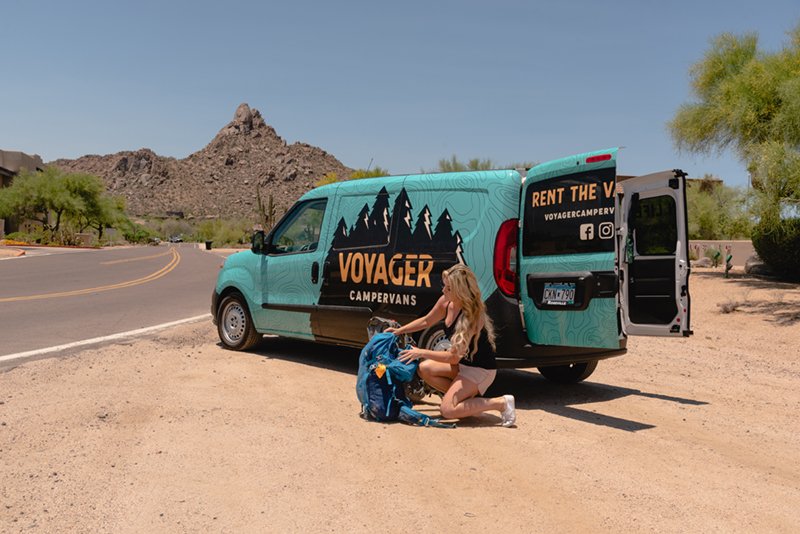
Tip: On my last visit to Havasupai, we rented a campervan from Voyager Campervans, which worked out really well as we were able to sleep in the campervan at the Hualapai Hilltop trailhead after arriving late at night (the couch folds down into a bed perfect for two!) It was awesome getting a really good sleep prior to starting the hike bright and early. The van also included a fridge and charging ports – perfect before disappearing into the wilderness for a few days!
Tip: Be careful on the last leg of the drive up Indian Road 18. We drove this late at night and encountered so many wild animals running across the road, including plenty of deer and horses.
Getting to Hualapai Hilltop from Las Vegas
From Las Vegas, it is about a 4-hour drive to the trail head (see map below)
Getting to Hualapai Hilltop from Phoenix
From Phoenix, it is about a 4.5-hour drive to the trail head (see map below)
The Best Time of the Year to Go to Havasupai
March, April, May:
During these months, the climate is pleasant and fantastic for hiking. March might not be warm enough for swimming, but there should be no bugs. There also likely won’t be blooming trees and fauna yet. In April and May, it’s warmer, more lush, and better for swimming, but starting to become more crowded.
June, July, August:
Summer in Havasupai is HOT! You’ll need to hike during the hours of the day there is shade (early morning, late at night) or else it can feel unbearable. The swimming is amazing during these months though, and the water surrounding you is so refreshing and plentiful. The place will be extremely crowded during these peak months. July and August can be monsoon months so there is a chance of thunderstorms and flash floods. (Click here to read about last year’s flash floods.)
September:
This is a great month to go! Pleasant and warm, but also busy. Note that flash floods can still happen until about mid-September.
October, November:
Pleasant but not quite as warm. Until about mid-October, the swimming and hiking weather is still great. The temperatures drop in November, but won’t be quite as pleasant for swimming.
December, January, February:
These are the winter months for Havasupai, and too cold for swimming. Temperatures can get to freezing during the night, especially in December and January. However, it’ll likely be much more quiet during these months. Check to confirm the campgrounds are open during December and January as they have closed in past years.
Here is a chart showing historical temperatures in Havasupai
Tip: The temperature can often be well over 100 F / 38 C in the summer. Plan to hike in the coolest part of the day, when the canyon is shady. Sunscreen, sunhats and carrying PLENTY of water with you are highly recommended.
Havasupai Temperatures and Precipitation by Month:

Getting the Lay of the Land – Trail & Village Map
Here’s a helpful map of Havasupai showing the parking area, start of the trail, the switchbacks (of death), the trail to Supai, the Tourist Office, Cafe, lodge, campground, and the main waterfalls.

The Hike into Havasupai
From Hualapai Hilltop parking lot, you descend 2,000 feet into the canyon. This first mile and a half is the steepest part of the entire hike, and you descend down it on the way into Havasupai (remember, you’ll be hiking back up this part on the way out!)
The rest of the 10-mile / 16-km hike is on fairly flat terrain. You walk through canyons, up and over rocky outcrops and through some sandy sections. Pack mules follow the same hiking path, so watch out for them (and their droppings) on your trek.
Tip: There are a few places you’ll find shade along the route, so I recommend stopping in the shaded areas you come across for water and snack breaks.
Hiking Elevation Profile:

Source: RockHounds
Available Drinking Water
There is no water available until you reach Havasu Creek (6 miles into the hike), so make sure you carry an adequate amount per person (ie. 3 litres per person).
There are a couple of small stores you will come across near the end of the trail. Here, you can buy cold drinks and various snacks and camping supplies – super handy if you realize you’ve forgotten something.
Tip: Of course, as this is a remote location, anything purchased here will be quite pricey and you should be prepared with plenty of cash on hand.

Checking In at the Village of Supai
The first place you MUST stop at along the route is the village of Supai. Here, you must check-in at the Tourist Office (don’t worry, the trail will take you straight here and you’ll know you’re at the correct place right away, as there are usually tourists everywhere).
The person whose name is registered on the reservation must be present and provide valid photo ID to check-in the rest of the party. You will receive a tag to place on the outside of your tent as well as a wristband you’ll need to wear during your visit.
Now that you’re in the village, you can choose to stop at the village restaurant (Supai Cafe), sit down for a rest and grab a meal. From memory, they served hamburgers, french fries, frybread, soft drinks – that type of thing. This can be a great little treat after the long, hot hike!
However, you’re not done yet.

Once you leave Supai, continue on to the campground. The trail will take you another 2 miles and down a bit more elevation before finally delivering you at the top of Havasu Falls.
Once you see these powerful waterfalls for the first time, you’ll immediately understand why everyone says that, even with the length of this hike and the often-sweltering heat, it is “completely worth it”.
Explore this view for a short period of time – it’s impossible not to – before continuing on the trail the final little stretch to the campground.
Once you arrive at the campground, take note of where the bathrooms are and the water fill-up areas near the entrance. Then, go for a wander and find your campsite!
Alternatives to Hiking into Havasupai
For those unable (or unwilling) to hike their gear into Havasupai, you can also take a helicopter or hire a pack mule.
Pack Mules:
Pack mules to carry your gear can be hired, but must be booked before your visit. Learn more here
Fees:
Between Hilltop Trailhead and Campground Entrance and Back: $400 round-trip.
One Pack Mule can carry up to 4 bags. Maximum weight: 32 pounds per bag.
Visitors should drop bags off by 10am at Trailhead and 7am at Campground.
Tip: I have heard numerous people saying the pack mules are not treated well. I did not notice this myself, but I would highly recommend doing a lot of research on this topic before choosing this as an option.
Helicopter Service:
Airwest Heli provides transportation from Hilltop to Supai and vice versa. (You will still need to hike the 2 miles to and from the campground).
Schedule of Havasupai Helicopters
March 15 to October 15:
Sunday: 10 am to 1pm*
Monday: 10 am to 1pm*
Thursday: 10 am to 1pm*
Friday: 10 am to 1pm*
October 16 to March 14:
Sunday: 10 am to 1pm*
Friday: 10 am to 1pm*
* Passengers are accommodated on a first-come, first-serve basis. Tribe members are treated as priority. Airwest will continue flying until everyone is accommodated, or until it gets dark. It’s important arrive as early as possible to get a good spot in line.
Flying Down: Helicopter location is at the trailhead. You’ll check in here and wait in line for your turn.
Flying Up: In Supai – helicopter pickup/drop-off is between the Tourism Office and the Cafe.
Fees:
The cost to fly one direction is $85 per person. Airwest accepts credit card payment (Visa, Master Card, and Discover – extra fee) or cash.
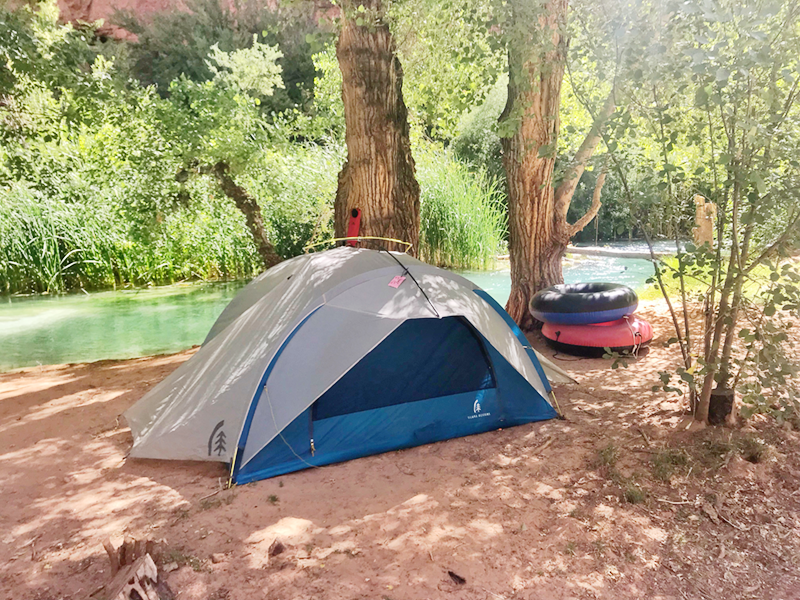
Havasupai Campground
The area for camping at Havasupai is about a mile long and is situated between Havasu Falls and Mooney Falls. Many of the sites are located right on the river that runs through the campground, and most of the sites also have a picnic table. You are able to camp wherever you like, and sites are first-come first-serve.
Tip: If you are concerned about getting a “prime” spot to camp, make sure to get an early start from the trailhead.
Remember to tie your permit tag to the front of your tent once you set up – you likely will encounter an official from the Tribe that comes through and checks for permits.
Tip: There are even more camping spots to explore on the other side of the river. Small footbridges have been constructed to help you safely cross.
Campground Amenities:
Havasupai Campground has the following amenities:
- Water spigot (one, near start of campground)
- Toilet facilities (four, spread throughout the campsite, pretty clean, with available TP)
- Picnic tables (at most campsites)
- Plenty of trees to set up hammocks
- Places to buy snacks and cold drinks near campground entrance (bring cash)
There are no garbage cans (pack out what you pack in), and no showers at Havasupai (but you’ll be swimming pretty much the majority of each day!)
Drinking Water at Havasupai
There is a fresh water spigot located near the entrance of the campground that is tested monthly for contaminants.
There are times when the Camping Office will recommend you do filter/purify the water. Just in case, it’s good to have a backup plan, such as bringing along water filtration tablets, a SteriPen, a water filter, etc. My recommendations are near the end of the post!
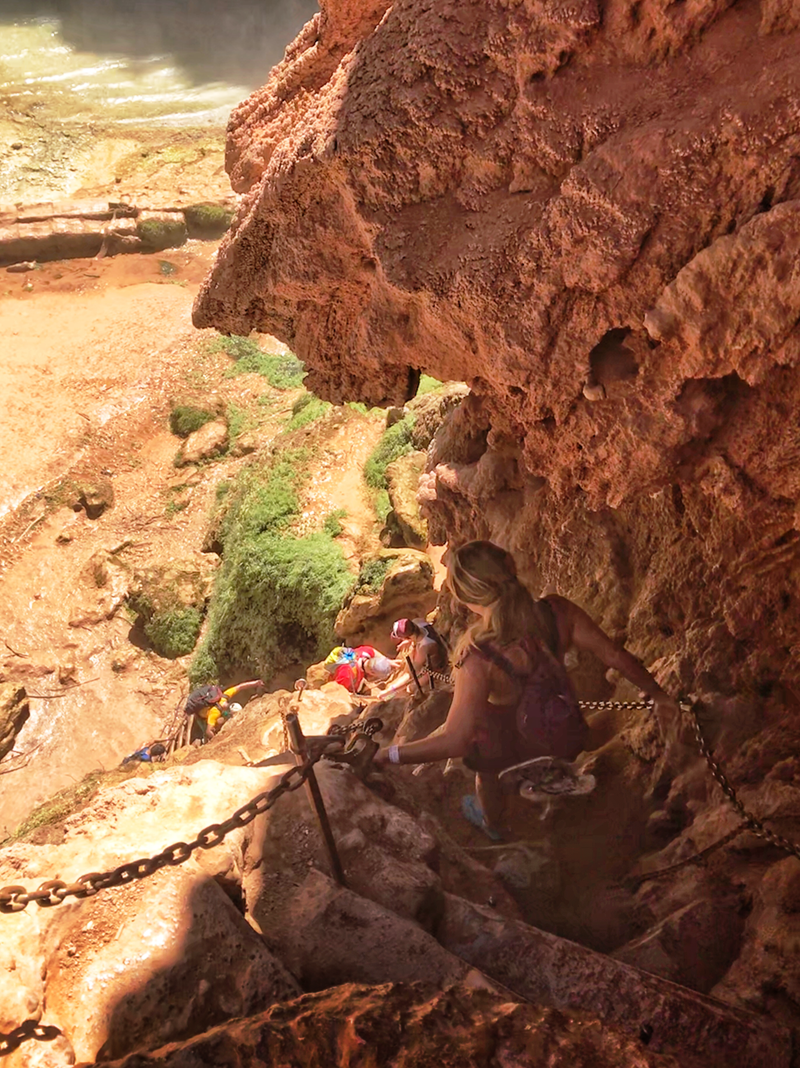
Hike to Mooney Falls
The trail to Mooney Falls begins right at the end of the campground. It’s just under one very short mile (1.6km) before you arrive at the top of this absolutely stunning waterfall!
Explore the views (carefully) from the top for a bit. Once you feel ready, you’re about to embark on a bit of an adventure to descend down into the pools below!

You’ll reach an area where you need to use chains and ladders for support to hike down a very steep trail. This area is often wet and slippery due to the fact that it is open to the spray from powerful Mooney Falls.
Just be careful, take your time, and you’ll be fine. Most people find that it is easier going up than down, so the way out is a bit more chill.
Tip: This area often sees massive traffic jams since it’s a slow-moving section. If you want to avoid a large lineup, head here early in the day.
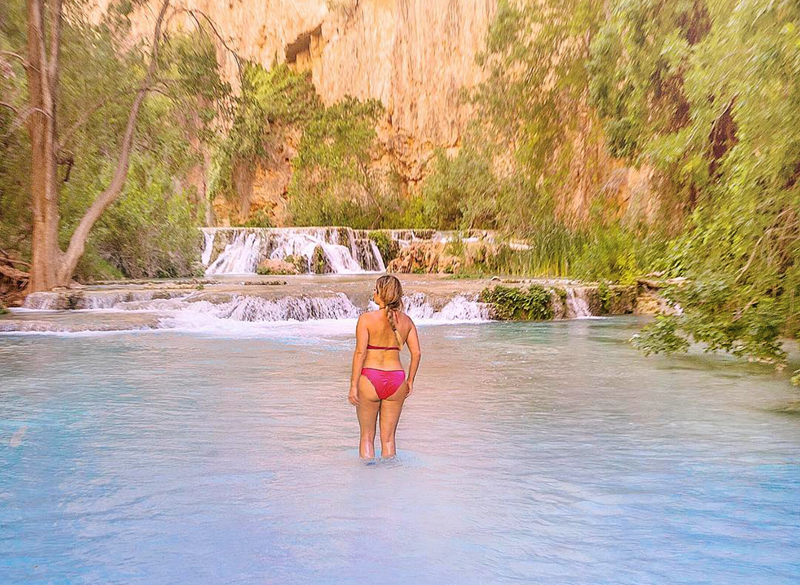
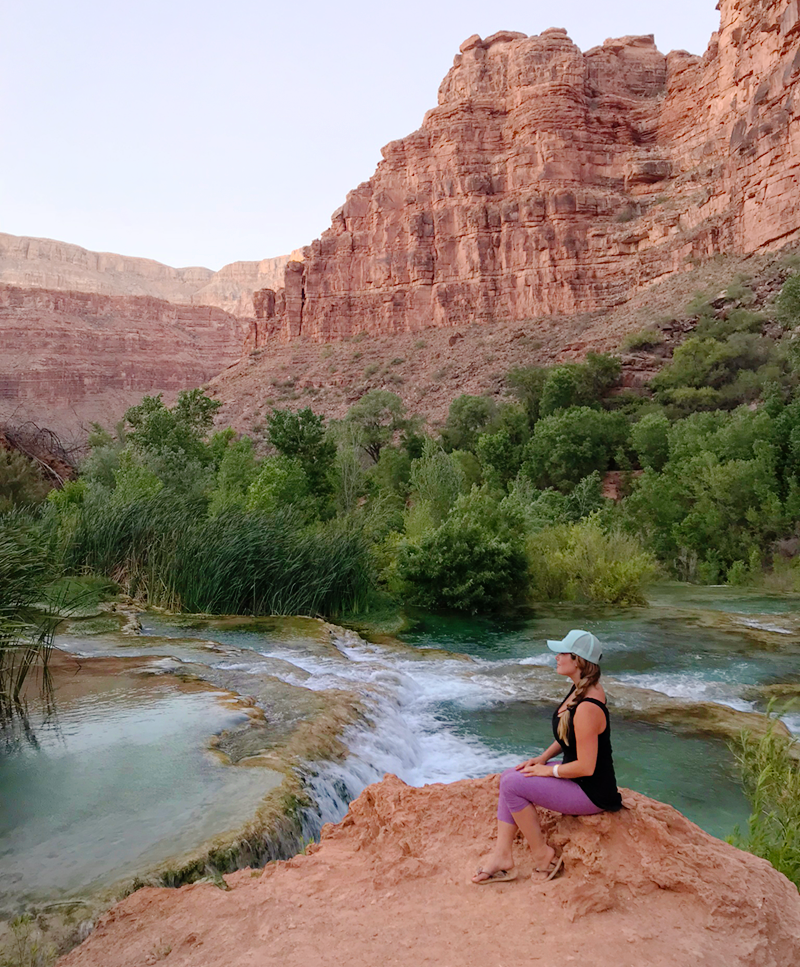
Once you reach the bottom, you’ve entered another water paradise! There are plenty of areas to swim or relax. Some people choose to spend the entire day here, and some decide to go on further to Beaver Falls (another 2 miles/3.2 km one-way).

Hike to Beaver Falls
Beaver Falls is not a large waterfall like Mooney Falls or Havasu Falls. Rather, it is a series of smaller waterfalls flowing in steps and pools down into a semi-larger waterfall.
There are multiple tiers of swimming holes you can enjoy here, and it is often not nearly as busy as Havasu Falls or Mooney Falls due to its distance.

The trail to Beaver Falls begins in the Mooney Falls swimming area. There isn’t one perfect trail to get to Beaver Falls (you sort of figure it out as you go), and you have to do a handful of river crossings during this trip, so be prepared and dress accordingly. I hiked in water shoes and it made all the difference!
Once you’ve climbed down to the base of Mooney, the creek continues down into the canyon. Follow it on the left side of the bank (if you’re looking downstream).
There are trails (somewhat) that follow close to the creek, and some trails that go up to higher grounds but still follow the general direction of the creek. Basically, they will all take you to the same place in the end, and if you’re following the creek, you’re probably going the right way.
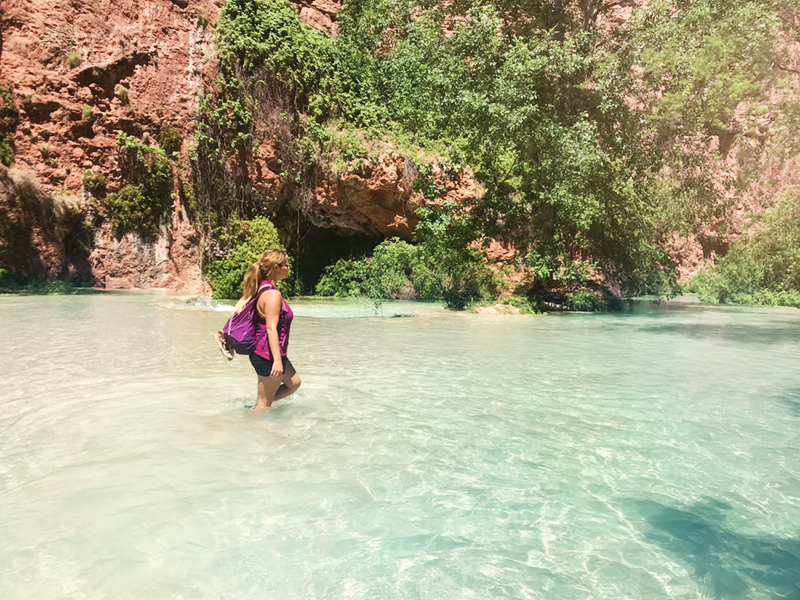
Tip: The creek crossings shouldn’t ever be higher than your waist at most, but I carried my daypack above my head just in case for areas I was unsure. In some sections, the sandy bottom does drop out somewhat, so just be careful and navigate slowly.
There will be a section that feels like a lush jungle that provides plenty of shade. Eventually, there will be a handful of ladders you need to climb up / down as you get closer to Beaver Falls, but all of these are much smaller and simpler than the section where you had to climb down to Mooney Falls! A piece of cake in comparison.
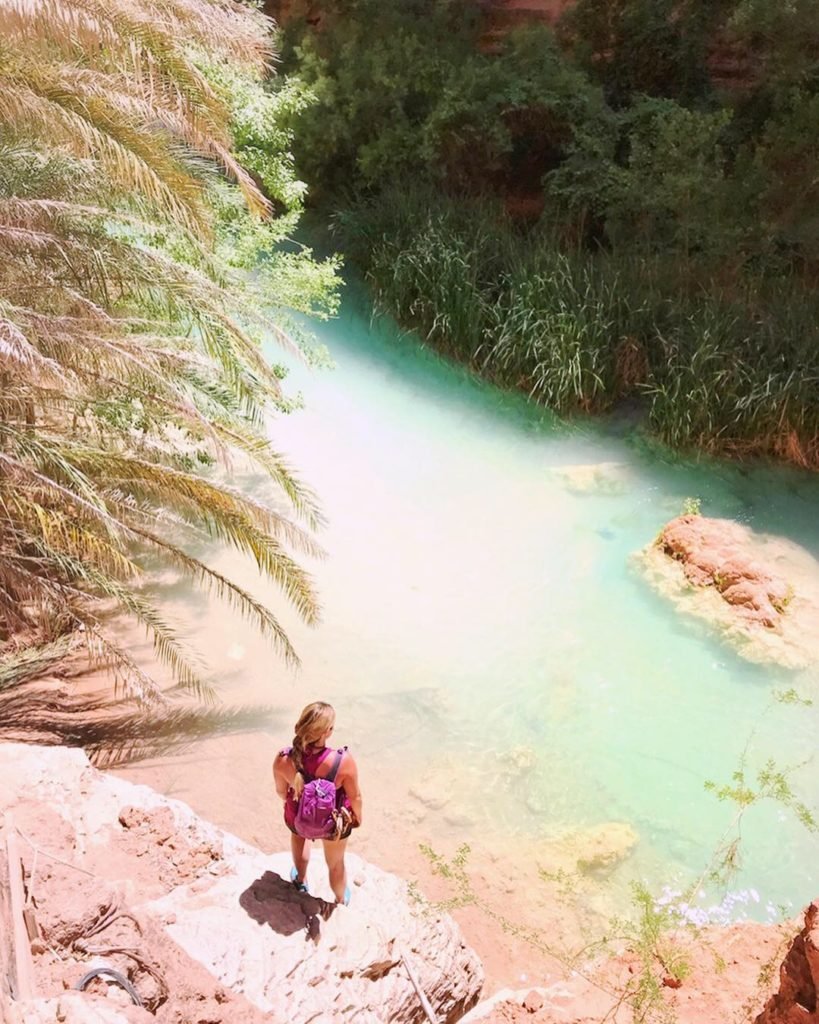
Tip: Keep an eye out for random palm trees. What an oasis in the middle of the desert!

Give yourself at least two hours per direction to get to Beaver Falls, as the trail can definitely be confusing. However, there will likely be plenty of people coming in both directions you can ask if you get stuck.
Tip: Try to head back while there is still plenty of daylight. You definitely want to be able to see when you are climbing back up the steep chains section from Mooney Falls back to camp.
 Rules at Havasupai
The Supai people take their laws seriously. Here is a list of just some of the laws at Havasupai, and associated fines for breaking these laws.
- No alcohol or drugs ($1000-$5000 fine and expulsion)
- Drones are not allowed ($250 fine and expulsion)
- No littering ($1000 fine)
- No vandalism ($500 fine)
- No removing natural resources ($500 fine)
Read about the rest of the laws on the Havasupai Tourism Code document here
Hiking Back Out to Your Car
The hike back out is a bit more challenging than the hike in. By the time you reach the switchbacks near the end that you need to climb up, it’s likely that you’ll be a bit tired. Make sure you have plenty of water and snacks on hand for the return.
There is very little shade on the trail, so depending on the time of year, the hike out can be very hot. If you are doing this hike during the exceptionally hot months of summer, plan to start your hike out in the very early morning.
Another option would be to hike out in the evening once it cools down. We did our first trip this way and it was fine (left the campground just before 8pm or so and were back to the car around midnight or so). Make sure you have extra batteries for your headlamp just in case.
Tip: I recommend passing through the village of Supai while it is still light out (we got a bit turned around here in the dark, but some nice locals directed us back to the trail)
What to Pack for Havasupai:
Click here to read my COMPLETE Packing Guide to Havasupai
COMPLETE GUIDE TO LIGHTWEIGHT TENTS: If you’re looking for a lightweight tent that’s great for backpacking (only 1-2 lbs), read my blog about the 2019 Best Backpacking Tents.
 Marmot Sawtooth Sleeping Bag: 15 Degree Down: backcountry.com
Pack up your Marmot Sawtooth 15 Degree Down Sleeping Bag and get ready for another day of trail-wandering, knowing that a good night’s rest is stuffed in your pack behind you. This sleeping bag’s well-rounded design and 15-degree rating will tempt you to bring it along as you explore the jagged peaks of its namesake mountain range or as you make yourself at home in Indian Creek for 3 months on a mission to throw down some crack climbs. The Sawtooth’s lightweight construction makes it a good pick for longer backpacking hikes while its roomier design and anatomical foot box make it a comfortable option when you’re sleeping in your car or near it. Stretch tricot baffles maximize the loft of the 650-fill down insulation to prevent cold air from creeping in on chilly nights spent dreaming of whatever adventures tomorrow holds.
 Therm-a-Rest ProLite Plus Sleeping Pad: backcountry.com
All-season warmth, self-inflating convenience, and lightweight foam make Therm-a-Rest’s ProLite Plus Sleeping Pad a favorite among backpackers, winter campers, and ski tourers. Its Atmos foam reduces weight, enhances compressibility, and adds warmth with Therm-a-Rest’s patent-pending diagonal-cut design. The self-inflating valve gives this pad plenty of cush, and you can add a few extra breaths for customized firmness.
 Katadyn Gravity Camp 6L Water Filter: backcountry.com
Katadyn’s Gravity Camp 6L Water Filter is definitely the lazy man’s filter, but that’s only because the lazy man has figured out what the rough-and-tough pump fanatic is still learning: you can get crisp, clear, and clean water without actually having to pump until your arm falls off.
The Gravity Camp uses a—wait for it—gravity-driven filter system that removes bacteria, cysts, and sediment from up to two liters of water every minute, so you can have a full six liters ready to go in the time it takes you to set up a camp chair in the shade. If you keep the filter protector clean, the Ultra Flow glass-fiber filter can clean up to 1,500L of H2O before it needs to be replaced. The tube also comes off easily via a quick-release valve to prevent contamination, and it has an automatic shutoff to keep your fresh agua from spilling onto the ground.

SteriPEN Ultralight UV Purifier: backcountry.com
Trust your water more with the SteriPen Ultralight UV Purifier. This purifier is small enough to take on nearly any adventure, and weighs in at just 3 ounces so your bag weight stays low. This purifier is water-activated, so it automatically starts on contact. This means you won’t accidentally turn it on in your pack or forget to turn it on in the water. Once on, it takes 90 seconds to purify a liter of water, and the rechargeable battery can power 20 treatments before you’ll need to recharge it.

L Space Tara Bikini Top – Women’s: backcountry.com
The Tara Bikini Top by L Space is the perfect blend of a sporty bikini with a feminine flare. Designed with a tankini style and racerback design you get reliable coverage and support for surfing and running on the beach, while the keyhole front is tied together with a stylish bow tie.

Astral Loyak Water Shoe – Women’s: backcountry.com
The Astral Women’s Loyak Water Shoe provides the traction, flexibility, and durability you need for all your summer aquatic adventures. The stitched Cordura upper is highly abrasion-resistant for durability, yet also breathable and quick-drying, thanks in part to drainage holes that allow water to escape while keeping entry of silt and sand to a minimum. The upper is also attached directly to the rubber outsole for a low-profile fit that fits into any kayak and gives you enhanced feel underfoot. G.15 rubber helps you maintain your footing on slippery river beds and slick rocks, and flex grooves allow your foot to flex naturally.
![]()

Astral Loyak Water Shoe – Men’s: backcountry.com
The Astral Men’s Loyak Water Shoe provides the right mix of grip, flexibility, and durability you need when guiding raft trips or kayaking technical rivers. The stitched Cordura upper is highly abrasion-resistant for durability, yet also breathable and quick-drying. The upper is also attached directly to the rubber outsole for a low-profile fit and enhanced feel underfoot. G.15 rubber helps you maintain your footing on slippery river beds and slick rocks, and flex grooves allow your foot to flex naturally.

Backcountry x Nalgene Goat Logo Wide Mouth Tritan Bottle: backcountry.com
There’s a reason the classic Nalgene design hasn’t changed in decades, and the proof is in the pudding—and in the Backcountry x Nalgene Goat Logo Wide Mouth Tritan Bottle. This impact-resistant bottle features a screw-on cap that won’t leak, and won’t run away on you, making it an ideal hiking partner, backpacking companion, or everyday vessel for staying hydrated. If you want your water chilled, it’s easy to stuff ice into the wide mouth, and measurements along the side come in handy when you’re cooking at camp or filtering water in the backcountry.
MSR Flylite Tent: 2-Person 3-Season: backcountry.com
Shave a few extra lbs from your pack when you bring the MSR Flylite 2-Person Tent on your next backpacking trip. With a trail weight of just 1lb 9oz, the Flylite is one of the lightest two person shelters on the market today, making it an excellent choice for ultralight backpackers and gram-counting thru-hikers alike.
Saving weight with a single-wall design, the fly is composed of a 10D ripstop nylon, which is treated with MSR’s Durashield PU coating for increased protection from unruly mountain weather. Fully taped seams and reinforced stress points prevent water from working through and ensure the tent holds up when the winds pick up. Mesh side windows keep the inside of the tent well ventilated, while a covered entryway gives you some space to get gear ready out of the rain. Setup requires two trekking poles, while the included two guy cords and the lightweight aluminum pole take care of the rest.
Click here for my entire guide to the 2019 Best Lightweight Backpacking Tents (1-2 lbs).

Packtowl Personal Towel: backcountry.com
Lightweight, quick-drying, and incredibly soft, the Packtowl Personal Towel is an excellent choice for travel, camping, and exercise routines. Its microfiber blend is not only exceptionally soft and smooth, but it also soaks up four times its weight in water for quick and easy drying. Plus, its antimicrobial treatment means this towel resists odor build-up when you’re camping and traveling for extended periods.
Disclaimer: There’s a chance that this blog post includes affiliate product links. At absolutely no extra cost to you, I may receive a small commission for any purchase made through these links. Any commissions received are very much appreciated, as they help me to be able to continue posting travel blog content free of charge to my lovely readers. Of course, all recommendations are unbiased, and I will always only recommend products and services that I truly believe in. Thank you for your support!
PIN FOR LATER


![]()

Questions? Comments? Some other topics you’d like me to cover? I’d love to hear from you, just leave me a comment below!
Great blog post! I’ve been to Havasu Falls before and you described the entire experience and details perfectly.
Thanks so much! I’m glad you enjoyed it and it’s awesome you have also had the opportunity to experience it!
“Enjoyed every bit of your blog post. Will read on…”
Glad you enjoyed it, thanks so much!